
Showcasing Craft: How to Translate Handmade Quality into High-Impact Images
Handmade goods carry stories—of materials chosen with care, of time-intensive techniques, of the maker’s eye for detail. Yet online, customers touch with their eyes. That makes product photography the most persuasive language an artisan can speak. Great images don’t just describe; they convey weight, texture, and finish. They whisper the provenance of wool, the grain of walnut, the sparkle of a hand-set stone. For makers selling on marketplaces, boutique sites, and social platforms, the goal is simple: create images that embody your craft so clearly that a viewer can feel the quality through the screen.
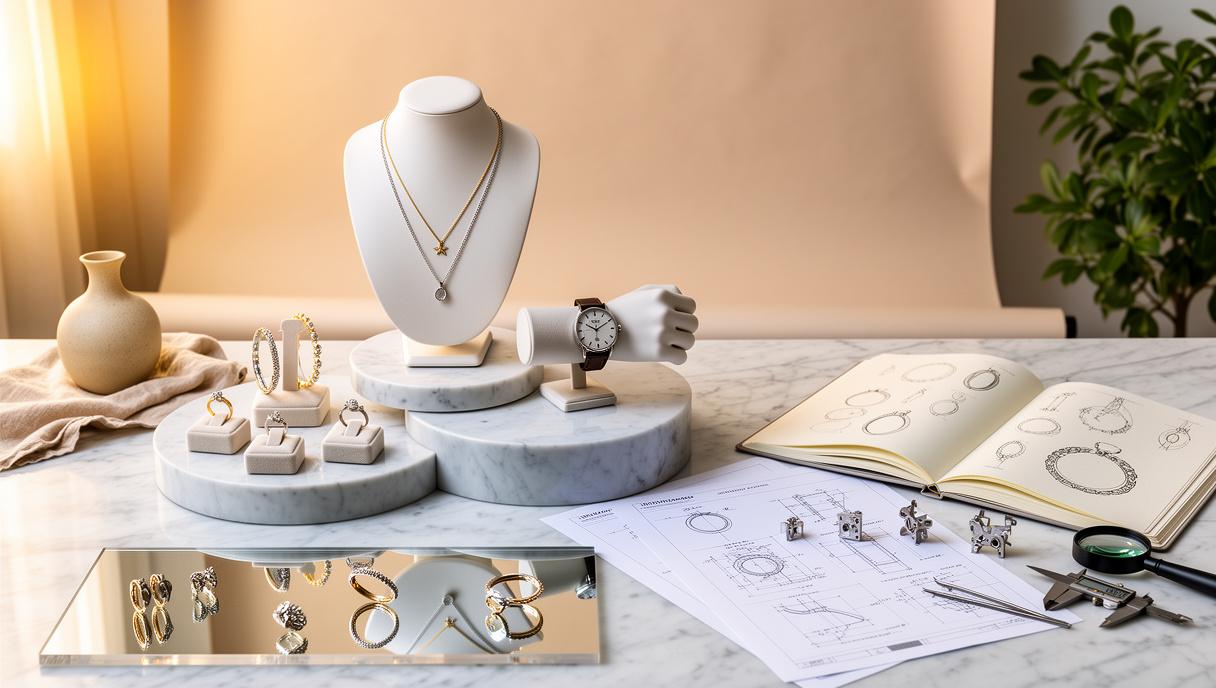
Begin with a purposeful shot list that reflects how people shop. At minimum, plan a hero image, a clean packshot on white or light gray, two or three detail shots, a scale reference, and one lifestyle context image. The hero introduces the personality of the piece; the packshot answers essential questions of shape and color; details reveal workmanship like stitching, patina, clasp mechanics, or gemstone facets; a scale shot (in-hand, beside a coin, on a model, or against a ruler) avoids returns from size misunderstandings; lifestyle shows the product living in an authentic environment, suggesting use and fit without overwhelming props. This structure builds a visual narrative that moves a buyer from curiosity to confidence.
Visual hierarchy matters. Keep the eye on the subject with simple backgrounds, gentle negative space, and deliberate lighting that flatters material qualities. For ceramics, soft side light reveals form without killing subtle glaze transitions. For jewelry, reflections must be managed so metal looks luminous, not blotchy; stone fire should sparkle without hot spots. Leather benefits from cross-light to emphasize grain and edge finishing. In every case, aim for consistency: similar angles, horizon lines, and color treatment across a collection. Create a repeatable setup so new pieces drop into a familiar frame—an approach that strengthens brand memory while accelerating production.
Authenticity is an asset, not a flaw. Light retouching to remove dust and lint is essential, but avoid smoothing away handcraft character. Show closures open and closed, capture the underside of a clasp, and include a quick view of packaging if it’s part of the experience. Use accurate white balance; if you worked hard to achieve a particular dye or alloy tone, honor it in-camera. And remember searchability: descriptive file names and alt text like “hand-forged sterling silver cuff with matte patina, size small” help discovery while reinforcing credibility.
Techniques and Setups That Make Handmade Products Shine
Light is everything. For small goods, choose soft, controlled light that wraps without flattening. A simple, effective setup: one large diffused key light (softbox or bright window with sheer diffusion), a fill card opposite the key to lift shadows, and a subtle back or top light to outline form. Use white and black foam boards as “flags” to shape reflections—white to brighten, black to sharpen edges and restore contrast on glossy surfaces. Jewelry and polished metals often benefit from a circular polarizer on the lens and, if possible, a sheet polarizer over lights to tame glare; rotate until reflections behave without killing the sparkle.
Backgrounds should support the story. Seamless paper in white, light gray, or soft beige is versatile and on-brand for many artisans, while textured backdrops (linen, stone, reclaimed wood) can add warmth to lifestyle shots. Keep props minimal and relevant—dried botanicals with apothecary goods, a simple ceramic plate with handmade cutlery, an unpolished stone behind a gemstone ring. Place items on a stable surface and anchor your camera on a tripod to maintain angle and scale across variants. For packshots, a shooting table or a DIY sweep (paper curve taped to a wall and desk) removes horizon lines for a clean, store-ready look.
For very small items, embrace macro-friendly practices. Move the camera back slightly and use a longer focal length to reduce distortion. Stop down to f/8–f/16 for depth of field, and consider focus stacking: capture multiple frames focused from front to back and blend them in post so the entire piece appears crisp. Tethered capture (cable to laptop or tablet) enables precise focus checks and exposure control. If using a smartphone, attach a quality macro lens, shoot with a manual app to lock white balance and exposure, and monitor the histogram to protect highlights, especially on metals and bright glazes.
Color accuracy builds trust. Include a gray card or color chart at the start of each session to calibrate white balance and maintain consistent tonality across shoots. Clean thoroughly before photographing—microfiber cloths, air blower, and cotton gloves prevent time-consuming retouching. In editing, limit adjustments to realistic contrast, gentle clarity, and spot removal; don’t change colors to something the buyer won’t receive. Export thoughtfully: square crops for marketplaces, vertical for Reels and Stories, and 2K–4K masters for future-proof sharpness. Keep naming and folder structures consistent—collection, SKU, angle, and variant—so your visual library scales as your catalog grows.
Scaling Visuals for E‑commerce, Social, and Seasonal Releases
Artisans often face a modern challenge: the craft bench is steady, but content needs are relentless. Product pages want four to eight images; marketing wants variations for ads, email, and social; wholesalers request line sheets; and seasonal launches require fast turnarounds. A practical approach is to build a repeatable “visual system” for your brand—defined angles for each category, a palette of backgrounds, a prop kit, and a schedule that batches similar tasks. Shoot all necklaces at the same two angles, all mugs with identical handle orientation, all scarves on the same bust form and flat-lay—then slot detail and lifestyle as needed. This repeatability accelerates production and creates a recognizable look that customers begin to trust on sight.
When timelines are tight, digital production can extend your craft without diluting it. If you work from sketches or CAD files before fabrication, modern visual tools can transform those assets into lifelike images for pre-launch teasers, colorway exploration, or wholesale previews. Lifestyle backgrounds can be tested virtually, letting you audition marble, linen, or slate; on-model imagery can be generated to validate proportion and styling notes before booking talent; multiple metal finishes or glaze colors can be visualized from a single base asset to streamline variant pages. These methods don’t replace the truth of the final handmade piece; they speed learning, reduce wasteful reshoots, and ensure your first physical shoot is laser-focused.
Consider a practical example: a jeweler preparing a spring capsule needs on-figure shots, clean packshots, and social-friendly verticals within a week. With a consistent angle guide and a simple three-light setup, the packshots can be captured in a day. On-figure images may be produced traditionally or virtually, mapped accurately to scale so chain length and pendant drop feel right. Background and shadow styles are matched across formats so a carousel ad, product page, and Pinterest pin look kin—a unified signal of quality. Platforms that streamline this pipeline can be invaluable for small studios and growing brands—centralizing shot templates, enabling drag-and-drop studios, and outputting 2K/4K images ready for storefronts and campaigns. For makers who want that advantage now, explore Product photography for artisans to turn sketches, CAD, or existing photos into polished, launch-ready visuals without the overhead of a full traditional shoot.
Local selling benefits too. If you’re prepping for a craft fair or boutique pop-up in your city, a rapid visual refresh—new packshots for signage, lifestyle images for a postcard, and verticals for last-minute social—can lift foot traffic and conversion. Keep a living style guide that records lighting positions, camera settings, backdrop distances, and editing recipes. That guide makes it easy to recreate your look after a long production week or hand it off to an assistant. As your catalog grows, integrate a simple DAM (digital asset management) folder structure and a naming convention so retailers, press, and collaborators can quickly find what they need. With a system in place, your images evolve from a one-off task into a sustainable advantage—supporting e‑commerce SEO, social storytelling, and wholesale relationships while honoring the essence of the work made by hand.
Perth biomedical researcher who motorbiked across Central Asia and never stopped writing. Lachlan covers CRISPR ethics, desert astronomy, and hacks for hands-free videography. He brews kombucha with native wattleseed and tunes didgeridoos he finds at flea markets.
Leave a Reply